
|
Demo User — Quick Start
⚠ Store name & some settings are locked in demo mode.
|
Standard (Licensed) User — Quick Start
✓ Full access to all store settings.
|
Which path am I on?
Use the chart below to find your path, then jump to that section.
| Download & Install ORO POS | ||
| ↓ | ||
| Do you have a purchased license? | ||
| No ↙ | ↘ Yes | |
|
Demo Path
Activate with email & PIN
Full POS features available ✗ Store name locked ✗ Store address locked ✗ Cloud sync disabled |
Standard Path
Activate with PIN or
.lic fileFull POS features available ✓ Store name & info editable ✓ Cloud sync enabled ✓ Production ready |
|
Step 1 — Download & Extract
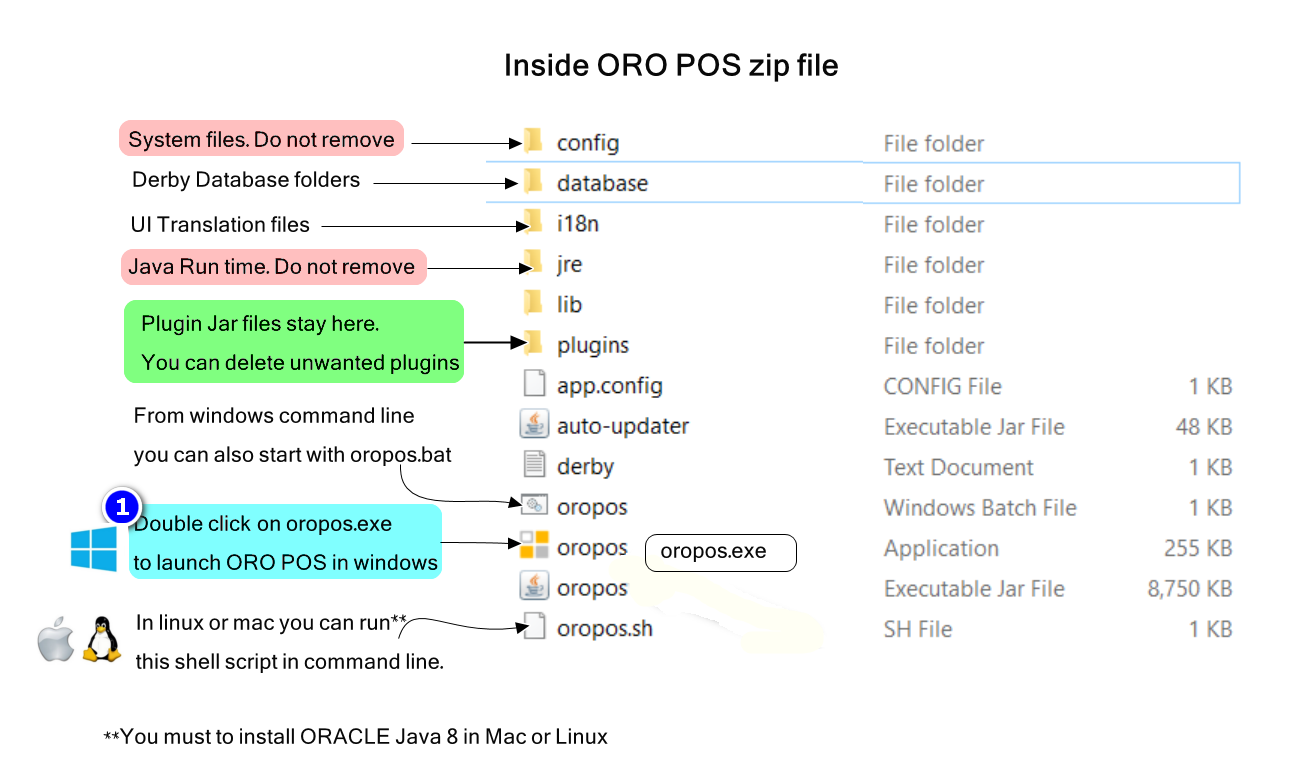
Go to orocube.com/download and download ORO POS. Extract the ZIP file — you will find these components inside:
| Folder / File | What it is | Required? |
|---|---|---|
| oropos.exe | Core POS application | Yes |
| plugins/floorplan | Table layout for dine-in restaurants | Optional |
| plugins/inventory | Inventory management & recipe tracking | Optional |
| plugins/customer | Home delivery, driver & loyalty points | Optional |
Don't need a plugin? Delete its folder before launching, or choose Default mode on first launch.
|
🪟 Windows
Java 8 is bundled — just extract and run
oropos.exe. No separate Java install needed. |
🍎 macOS
Requires Java 8 (not bundled). Covers Intel & Apple Silicon, plus macOS security warnings.
|
🐧 Linux / Raspberry Pi
Requires Java 8. Covers Ubuntu, Debian, CentOS, RHEL, Fedora, and Raspberry Pi OS.
|
Step 2 — Launch ORO POS
Launch instructions differ by operating system. Follow the guide for yours:
|
🪟 Windows Java is bundled — double-click oropos.exe
|
🍎 macOS Requires Java 8 install + security steps |
🐧 Linux / Pi Requires Java 8 install for your distro |
→ Launching ORO POS for the First Time
Demo Path — First Use
Demo licenses are fully functional and intended for first-time evaluation only. They must not be used in a live production environment.
→ How to activate your license — License Activation Guide
What is restricted in Demo mode?
| Feature | Demo | Standard |
|---|---|---|
| Taking orders & payments | ✓ Full access | ✓ Full access |
| Menu programming | ✓ Full access | ✓ Full access |
| Reports & back office | ✓ Full access | ✓ Full access |
| Store name | ✗ Locked | ✓ Editable |
| Store address & contact | ✗ Locked | ✓ Editable |
| Cloud sync | ✗ Disabled | ✓ Enabled |
| Warranty & support | ✗ Not included | ✓ Included |
Your first transaction (Demo)
- At the login screen, enter PIN 1111 to access the Back Office.
- Tap Clock In, then start a Store Session.
- Tap Assign Drawer to activate the cash drawer.
- Tap Take Out, add items, tap Send, then Settle.
To reset the demo database: close ORO POS, delete the database/derby single folder, relaunch.
Standard Path — Store Setup
Standard licenses unlock all features including store configuration, cloud sync, and full support.
→ How to activate your license — License Activation Guide
Set up your store
After activation, run the Store Setup Wizard to configure your store name, address, tax settings, and currency before going live.
- Log in with PIN 1111 → Back Office → Store Setup Wizard.
- Enter your store name, address, and contact details.
- Configure tax rates and currency.
- Add your menu items or import from a spreadsheet.
Your first transaction (Standard)
- Tap Clock In, then start a Store Session.
- Tap Assign Drawer.
- Select an order type, add items, tap Send, then Settle.
Next Steps
|
Store Setup Wizard Configure store, tax & currency |
Menu Programming Create menu groups, categories & items |
|
|
Recommended Hardware Printers, drawers & payment terminals |
Multi-Terminal Setup Connect multiple POS stations |
|
Need help? Call 1 (800) 844-6603 or email helpdesk@orocube.net